
1. Version Information
2. Document Purpose & History
This document is intended to provide the reader with the necessary steps in restoring IPCR download button.
IPCR Download Button Restore
The first step is to install and configure SAMBA. This is an FTP server that allows us to transfer files onto the Fedora system so we can install it.
- First open up an SSH connection to the IPCR. This will require a local connection or TCP port 22 forwarded from the router.
- Once connected enter the password, if it has not been changed from default it will be the standard username and password.
- Type the command yum install samba This will order the IPCR to download and install Samba, this will require an internet connection for the IPCR.
- Once it has been installed then open the SAMBA config file using vi which is a text editior built into Fedora. The command should be vi /etc/samba/smb.conf this will open a text file which you can edit. For details on how to edit text with vi here is a guide: https://www.howtogeek.com/102468/a-beginners-guide-to-editing-text-files-with-vi/
- In the smb.conf file you will need to make two changes, the first is you need to set the workgroup (or domain) you are connecting from, if you are part of a domain that will be the domain name, if you are not part of a domain it will be the workgroup which you can check on your own machine. To change this type in /workgroup this will search the document and take you to the section for work groups. Press i to enable editing and enter the workgroup.
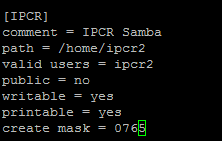
- Scroll to the bottom of the document and you will see the section for users and directories. Add the following at the bottom:
[IPCR]
comment = IPCR Samba
path = /home/ipcr2
valid users = ipcr2
public = no
writable = yes
printable = yes
create mask = 0765
- Once that is done press the escape key to leave input mode. Then type in :wq this tells vi that you want to write and quit (save and exit in Microsoft terms).
- Now that you have samba working you need to set a password so you can log in. so do this enter this command: smbpasswd -a ipcr2 This will set a password for ipcr2 which is a built in account on the IPCR.
- Now that samba is configured you want to restart the samba service to apply the changes that you have made. The command for this is service smb restart once this is done you are ready to connect.
- Now go to a windows machine and open file explorer and type in the address bar at the top the ip address of the system with \ before it. Like this:
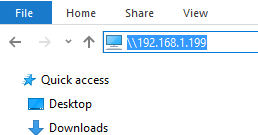
- If the samba has been configured correctly you should see a box asking for login details. Put in the username of ipcr2 and the password you set and you should see the network drives below.

- Go into the ipcr2 network drive and copy the search_download.sh file across into that network drive.
- Go back into the ssh session to the IPCR and type in cd /home/ipcr2 if you then type in ls you will see all the files in that directory, one of them should be sh type in ./search_download.sh and this will run the file.
- You will see a quick burst of text and then be back at the command line again. Type in reboot and the IPCR will restart. If you check the search tab in the IPCR it should now have a download button again.
“

Leave A Comment