
1. Version Information
Installation Guide for vUCP and its Modules
2. Document Purpose & History
Outline of Installation Process
The vUCP and modules follow the same basic steps.
- Confirm Network Settings and Virtualised Environment
- IP address and mask
- Default Gateway
- Firewall External IP Address
- DNS Server (required by vMCIM)
- Check VSphere
- Download OVF files and updates from Pragma Partner Portal
- Deploy OVF files
- Power on VM
- Connect to VM
After completing the first 5 steps for a module, the installation should be completed for the module. Completion steps are different for different modules.
Installation Order
The vUCP should be installed, and completed before installing any other modules. The vUCP contains the licensing used by the other modules.
Step 1 Confirm Network Settings
The vUCP and modules should each be assigned a static IP address on the same subnet.
The vUCP and modules require VSphere 6.0 or higher. It cannot be deployed on other Virtualised technologies.
Each module consumes virtual resources, confirm the resources are available on the VSphere installation before beginning to install.
Step 2 Download OVF Files
Each Virtual machine is a zip containing a VMWare OVF file, (virtual machine specification) and disk image(s) (operating system and application software). Each zip file is approximately 2GB. After downloading the zip file, the file should be unzipped to proceed to step 3.
Some OVF require updates to be applied after installation, an upgrade is typically 250MB.
Depending on Internet speeds, these files can take a long time to download, ensure you have the OVF files before beginning the installation.
Step 3 Deploying the OVF Files
A login with role or permissions to deploy/create new Virtual Machines is required for this step.
The vUCP and modules support vCenter, however in this guide we will focus on a standalone VMWare installation.
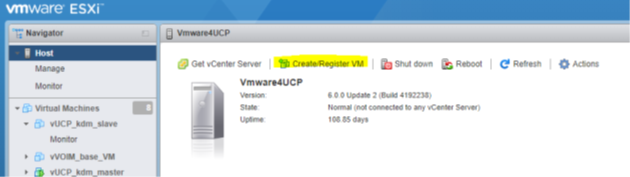
Use a web browser to browse to the VSphere ESX host. Login with the credentials supplied by the VMWare Administrator.
Click on Create/Register VM, to being the VM Creation Wizard.
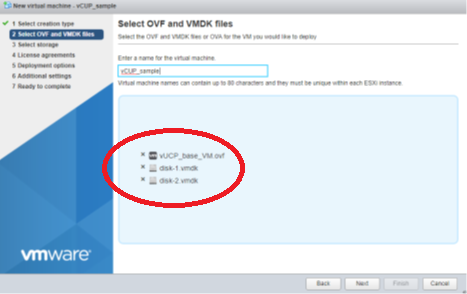
Name the new Virtual Machine in the Wizard.
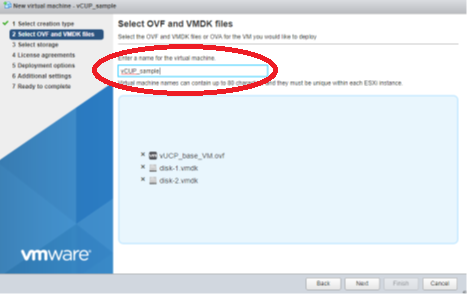
Drag and drop the ovf file, and the disk files for the virtual machine from explorer to the area in the wizard.
The number of additional disk files varies by module.
vUCP and vUVM have 2 disk files.
vVOIM, vVOIMT and vMCIM have only 1 disk file.
The last 3 decisions are the data store, disk provisioning and the networking. On a simple stand alone VSPhere server, there is typically only one data store.
Simply choose the data store to be used and click next
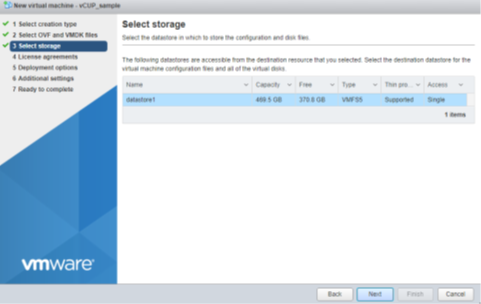
Ensure you choose the correct Network. On simple stand alone VSphere installations, with a single ethernet interface, their is only one network. Again as the VSphere installation becomes more sophisticated, so the number of choices will increase.
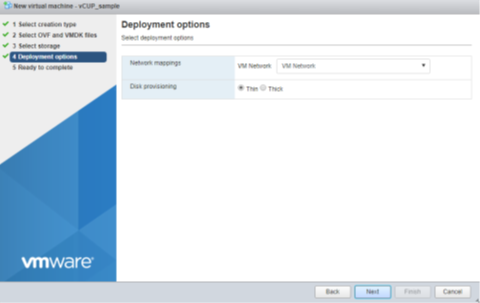
Typically you should choose Thin Disk Provisioning.
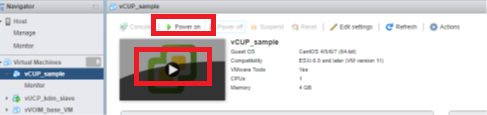
Step 4 and 5 Powering on and Connecting
Use the play button in the console or the Power on Button on the Toolbar to power up the vUCP.
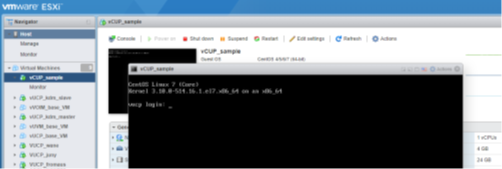
Click on the console to bring up a console window and login using:
Login: root
Password: centos4vucp
You can connect over SSH as well. with default IP addresses.
vUCP: 10.10.10.2 mask 255.255.255.0 gateway 10.10.10.1
vUVM: 10.10.10.3 mask 255.255.255.0 gateway 10.10.10.1
vVOIM 10.10.10.4 mask 255.255.255.0 gateway 10.10.10.1
vVOIMT: 10.10.10.5 mask 255.255.255.0 gateway 10.10.10.1
vMCIM: 10.10.10.9 mask 255.255.255.0 gateway 10.10.10.1. vMCIM ssh listen on port 60022
Setting the Correct IP Address for vUCP, vVOIM, vVOIMT and vUVM
At the command prompt type nmtui, to run the “gui” configurator.
Choose “Edit a Connection”, and choose inter face eth0.
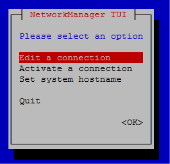
We must use Static IP addresses, so configuration must be set to manual.
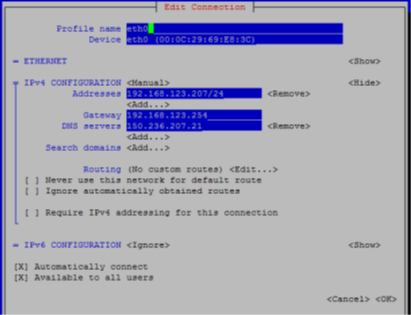
In the Addresses field change the address to the new IP address and subnet mask. The interface uses the IP Address/mask bits format, v.w.x.y/z, where v.w.x.y is the ip address, and z is the number of bits in the sub net mask. Typically the subnet mask is 255.255.255.0, so the number of bits is /24.
Add in the default gateway, and add a DNS server.
Press OK to save the changes, and then exit out of the application.
Use the command “reboot” to reboot the virtual machine for the new IP address to take effect. Test the changes from your PC by pinging the new IP address.
Completing the Installation of the vUCP
After setting the IP Address on the vUCP and rebooting you can access the vUCP web admin interface, as you would do on a UCP. The “out of the box” username and password is the normal “admin”, and “1234”.
A problem the vUCP has is the 1st boot wizard. As we do not have a physical DIP switch 4, we cannot turn it off until after the wizard reboots. If we make changes in the wizard (such as setting the firewall IP address), that require a reboot, the system will reboot and then clear the changes made as DIP switch 4 is still set to initialise the system.
- Run through the wizard.
- Do not change the country code, network settings, as these will force a reboot.
- When the wizard has completed, goto Maintenance->Trace->DIP Switch Status and change DIP Switch 4.

The DIP Switches are changed here on a vUCP, as there are no physical switches.
You can now set the country and firewall IP address.
The last step on initialising the vUCP, is to create the Serial Number, and apply licensing so we can add our modules when completed.
Go to Maintenance, License Management, License Upload and press Transfer to Create a Serial Number. vUCP Serial Numbers are much larger than UCP serial numbers.

Once you have a valid serial number, you can use this to purchase licensing for the vUCP.
You can enable the Temp License to finish off installation of the modules.
Completing Installation of the vVOIM, VVOIMT, and vUVM
Log into the vVOIM(T) or vUVM with a web browser using its IP address. There is no password set by default.
Note the MAC Address of the unit, we will use this later to virtual register the unit on the vUCP.
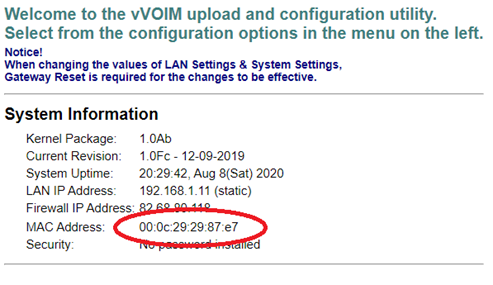
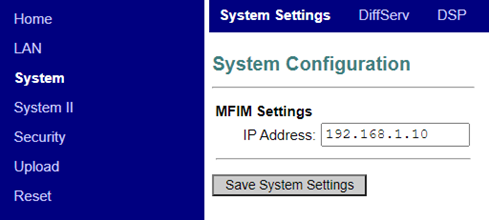
In System->System Setting place the IP address of the vUCP.
Note: vVOIM(T) and vUVM will always connect in Local/Remote mode, which is why we must set the static IP address.
Virtual Register the module in the Virtual Registration table in Device Port Number Change (101).

Completing Installation of the vMCIM
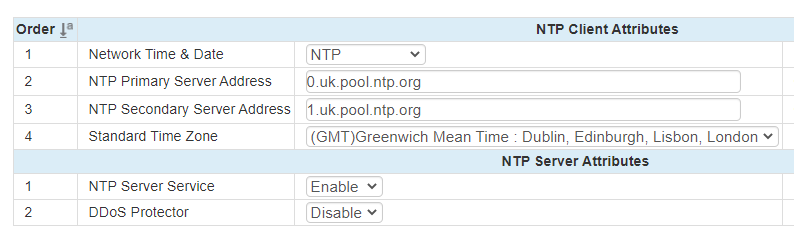
The vMCIM checks its licensing with the vUCP and an external licensing server. The process is time critical, so an NTP server must be used with the vMCIM, and on the vUCP.
Ensure that at NTP attributes (195) are configured on the vUCP.
Use appropriate Client settings for your installation, and enable the NTP server.
Login to the vMCIM using ssh (remember ssh is on port 60022), or via the VSphere console.
The username and password is, root and centos4vucp.
Type “cd /home/maint/config” and press return, then “./install-mcim.sh” and press return. This brings up the commissioning app.
The application will ask you a set of questions, which you need to answer.
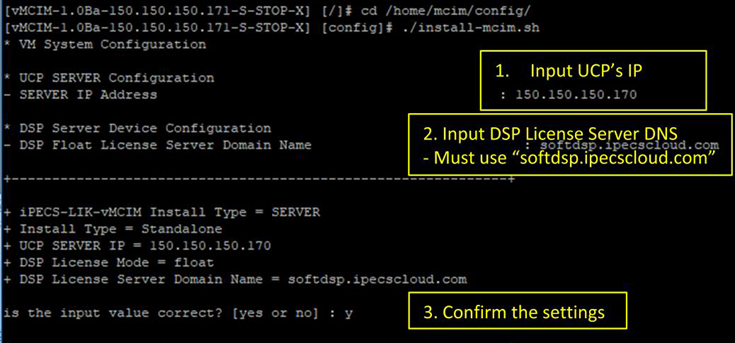
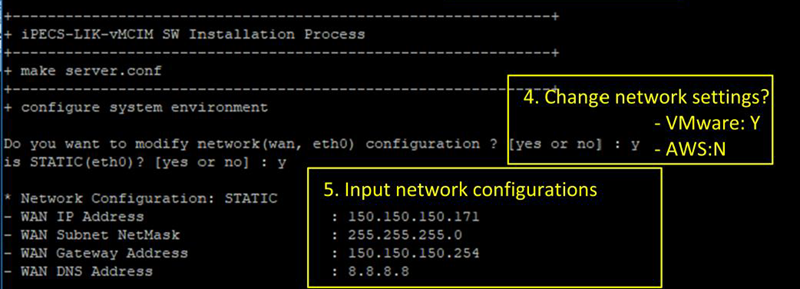
We also setup our networking here when using VSphere.
After completing the application settings, we need to reboot the device:
Type “cd /home/mcim/” + return, then type “./restart.sh”
Follow the step above for the vVOIM(T) and vUVM, to log in via a web browser and configure the vUCP IP address.
After configuring the vUCP, modules and then virtually registering the modules you should see the modules connected in Program 103.
“

Leave A Comment