
1. Version Information
2. Document Purpose & History
This document is intended to provide the reader with the necessary steps to setup a 3rd party SIP User
iPECS Cloud – 3rd Party SIP User Setup
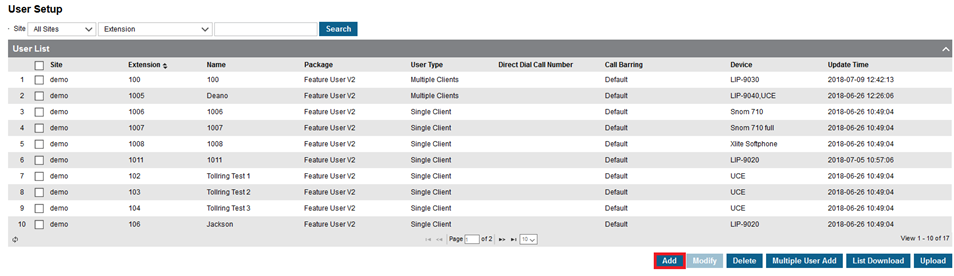
First login to the iPECS Cloud portal and navigate to User > User Setup
Next we will look at creating Users, there are a few different ways that this can be done. The first type is adding a single user client this is a 1:1 device where one licence is linked to one device.
The first thing we want to do is click Add
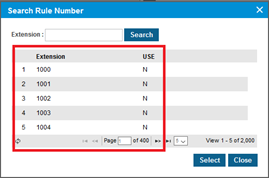
Now we will need to choose our extension number, depending on what our numbering plan is set to, will depend on how this is done. If we have no rule used then we will need to manually enter the extension number.

If you are using a predefined numbering plan then you will automatically have the next available station selected for you, if you would like to change this then you have the option to click the magnified glass icon this will then give you a popup to then choose which station you would like to select as shown below.

Now you need to enter the Extension Name and choose the Site that this station will be linked with.

After this you will need to choose if this user will be a single or multi site group user. If you are set to a single site user then you will only be able to be added to groups that are set to your current site.
If you are set to a multi site user then you will be able to be a member of the group regardless of the site that is linked to the group.

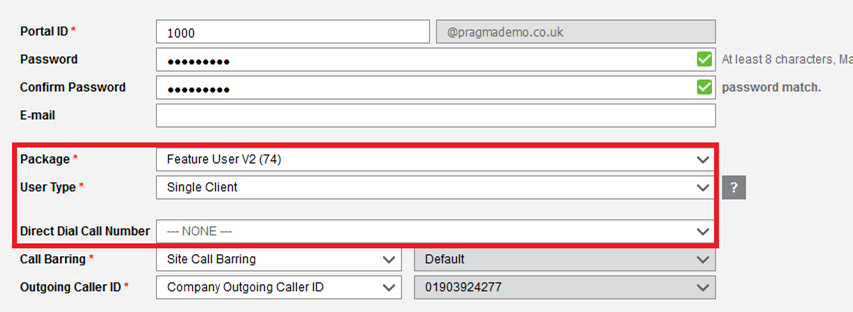
Now we need to set the Portal ID and Password, as a standard convention we would advise to set the Portal ID to the same as the extension number. The reason we advise to do this is that once the Portal ID has been set then you are unable to amend this without deleting and recreating the user.
You can then set the password, this has to meet certain criteria. The password must be between 8 and 15 characters and include 3 of the 4 character types Uppercase, Lowercase, Number and Symbol.
Once you have done this you can also assign the email address to the user, this address will be used should you chose to use voicemail to email.

Next we are going to select our package, this is the Users licence and if you do not have any remaining, you will need to place an order for more.
Next you will select the user Type, for this we are going to select Single user.
We will not use the Direct Dial number field as this is a legacy field that is no longer used as we have the DDI Summary page where numbers can be routed.
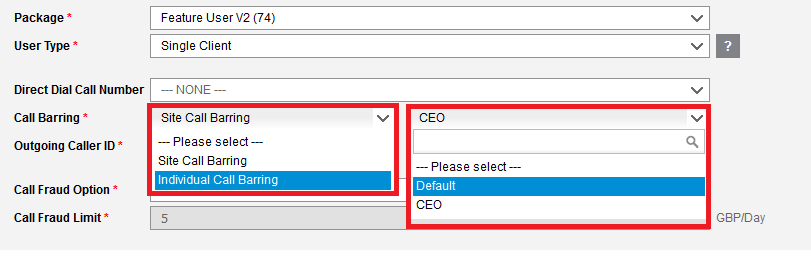
Now we are going to look at the call barring rule linked with the station, you have 2 options the first is site based Call Barring, this will use the call baring rule that you have already linked with the site that this extension is linked to this was set up in Site Management.
The other option is Individual Call Barring rule, this will allow you to pick from any call baring rule on the system. This would most commonly be used for a CEO or business owner who may need to make calls to additional international destinations but you do not want to allow all users to have access to dial these destinations.
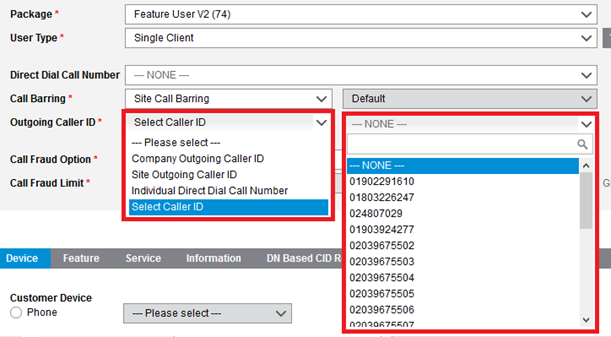
Next we need to configure the CLI that this station will be sending, There are 4 options available.
- Company Outgoing Caller ID – This will display the Cli that you have set within company details.
- Site Outgoing Caller ID – This will display the Cli that you have set within Site management for the site that this station is linked with.
- Individual Direct Dial Call Number – No longer used as this uses the DDI Call number field
- Select Caller ID – This will allow you to select any CLI linked with this account this will be the most commonly used to present your DDI
The last setting before we select the device is the Call Fraud Option.
Call fraud on the iPECS Cloud is set per user per day so this does not need to be set to a high value and will scale with the system as users are added so unless the customers call pattern changes you should not have to make any changes.
You will have already set the call fraud option against the customers account. There will have been 2 values that you have been asked to input the default value and a maximum allowable value.
Now on the user we are going to select to use either the User Default or we can use Select Individual Call Fraud this will enable you to enter any value up to the maximum allowable limit.

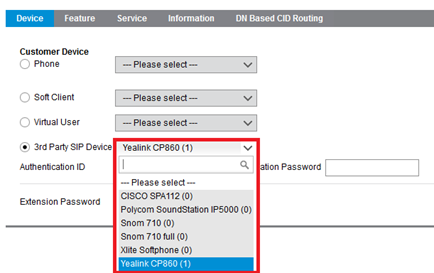
The iPECS Cloud has a list of accredited 3rd party SIP phones that you will be able to register.
These devices are currently being expanded on so if you have a device that is not in this list please contact us about getting this added.
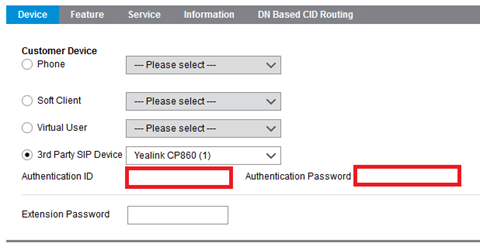
Select the Device from the drop down list. Once you have done this you will need to enter the Authentication ID and an strong Authentication Password. These can then be entered in to the corresponding fields on the SIP Device to enable registration.
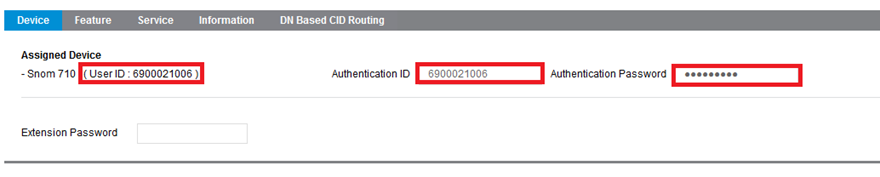
Once you have created your user go back into the user as you will also need the user ID field that is automatically populated to register your 3rd party SIP device.
“

Leave A Comment